CSULB Projects
Network Security
Network Security

Company: ConnectWise

For this project we needed to properly configure our Pfsense firewall to work with Kali Linux, Ubuntu and Debian virtual machines.
The following steps where taken so that in the end we would learn how to block network traffic but also allow it with rule sets. Then we needed to get an apache2 server up and running and accessible from a different VM. Once we had that up and running we needed to get an SSH session going from another VM. Install and configure Suricata on the pfsense firewall and set up custom rulesets so we can perform a Denial of Service (DoS) attack and also brute force the SSH session from our Kali VM. These are the steps that I took to reach the goal and how I finished the Net Sec Final Project...Network Security Final Project
VM #1 is a pfSense firewall. It separates the internet from your local scenario and works with NAT between the networks. The firewall is configured to get, on the WAN interface, an IP address from the same subnet as VM #1 and your physical host (DHCP client). PfSense is the DHCP server and the default gateway for your local environment for the LAN interface. PfSense also runs Suricata and OpenVPN for some of the tasks. There is no need to install anything else on the host.
Note: We strongly recommend you become accustomed to taking notes on the information you are receiving.
VM #2 is a Kali VM. It may have some important tasks later in the project. It runs in bridged mode, which means the VM has an IP address on the same subnet as your physical host.
VM #3 is an Ubuntu host. It hosts some services, including a web server that simulates an internal web service for external access. There is no need to change or configure anything on this host.
VM #4 is a Debian host. This machine represents the local network clients and is used for remote access tests. It is a DHCP client in the local network.
Scenario Validation
Before you begin the project tasks, it is essential to verify that all VMs are operational. Check the connectivity among them and become familiar with their configurations. Everything was designed to work and run as expected if the import process and configurations were correctly done.
To ensure the VMs function as they should in your environment, perform the following tests:
1 Check IP addresses for all hosts.
Pfsense - WAN – 10.0.0.123/24 LAN – 172.16.77.1/24
Ubuntu – 172.16.77.10/24
Debian – 172.16.77.107/24
Kali – 10.0.0.122/24
2 Check that PfSense is updated.
Version 2.6.0-Release is installed
3 Host pfSense should be able to ping any host on the internal subnet, which can be done by selecting option 7 in the pfSense machine's menu.
4 Any VM in the internal subnet should be able to ping any other VM.
5 The Kali VM in the external subnet should be able to ping the physical host but not the other VMs.
6 From the VM in the external subnet and your physical host, you should not be able to open the pfSense management webpage.
7 Use the Ubuntu VM to open the pfSense management webpage.
Project Task 1: Blocking Unwanted TrafficA primary complaint of GoodCorp's HR is that some employees spend time with apps they should not use. For example, an employee was caught several times playing online games when he should have been placing orders on supplier websites. The HR manager has requested that you block the games and get the employee to focus more on his job.
You know HTTP is important for GoodCorp's business and should be accessible. Web traffic is your company's most common communication with its customers and suppliers. It definitely should not be blocked.
For this project, the ICMP protocol is used for gaming.
Tip: In real life, port numbers, destination addresses, and source addresses can be different, but the concept of blocking one traffic type (or destination) while allowing others is the same. Therefore, you only need to create a firewall rule that disables traffic other than HTTP in this project.
These are the steps you need to follow:
1 On your Debian VM, test that traffic is allowed. a. Use a terminal to run pings to different LAN addresses (the VMs).
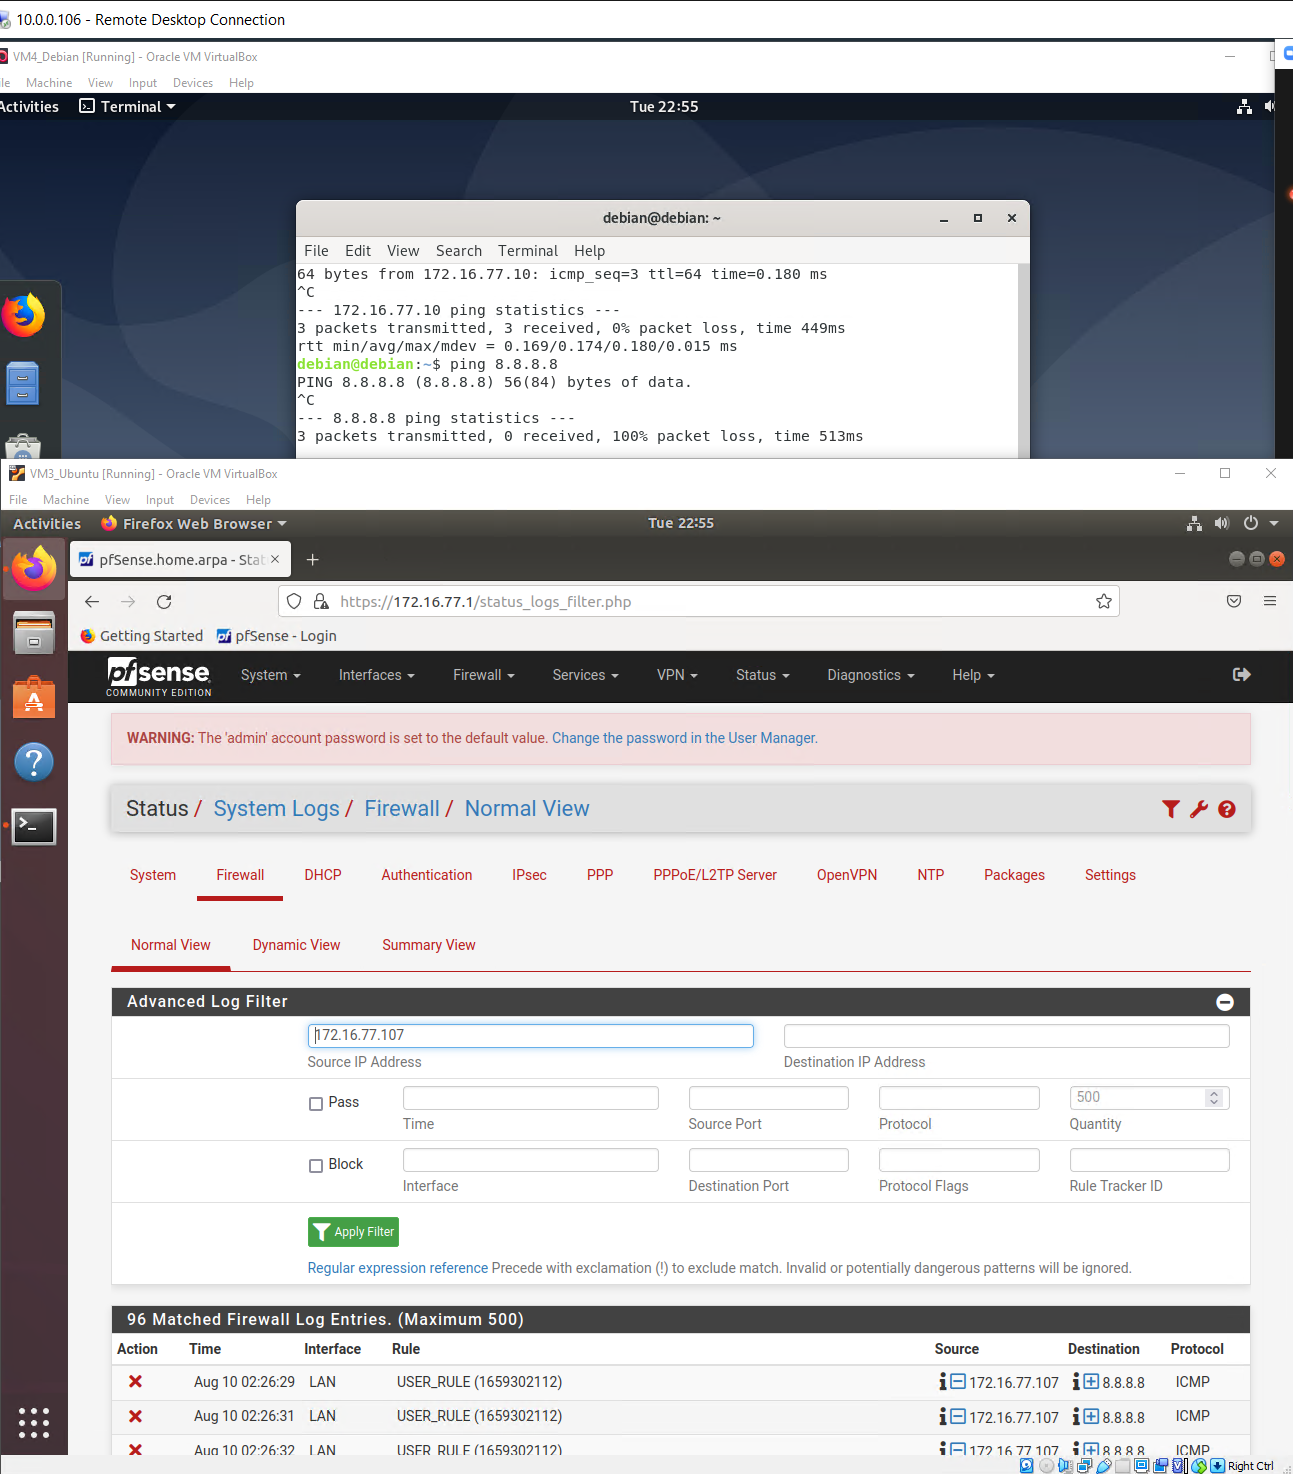
Test ping 4.2.2.2 Ping successful
Test ping 8.8.8.8 Ping successful
2 For the LAN interface, create a firewall rule blocking traffic not allowed for a specific destination. a. Use 8.8.8.8 as the destination to be blocked for ICMP.
b. Another request: Set pfSense to log packets that match the rule.

3 Add a rule to the WAN interface to allow ICMP traffic. (This is to allow hping3 and ncrack.) 4 Ping both WAN addresses again.
Before beginning Project Task #2, consider the following:
What evidence can you provide to show that everything works as expected?
Using Ubuntu set the configuration in the pfsense to deny ICMP traffic to 8.8.8.8 and then an allow all ICMP from Any Any on WAN.
We can also see this took if we look at the log file located under:
Status/System Logs/Firewall/Normal View, and sort by protocol to show ICMP and we can see it has blocked the 8.8.8.8
Project Task 2: Quick Solution for Remote AccessThe warehouse manager requested VPN access for the employees. Still, while the firewall is not licensed and configured to work as needed, he wants the employee to have temporary access via other means. He asks you to make the web server and SSH service available for connection from remote networks, and you need to come up with a logical solution for the issue.
What would that solution be?
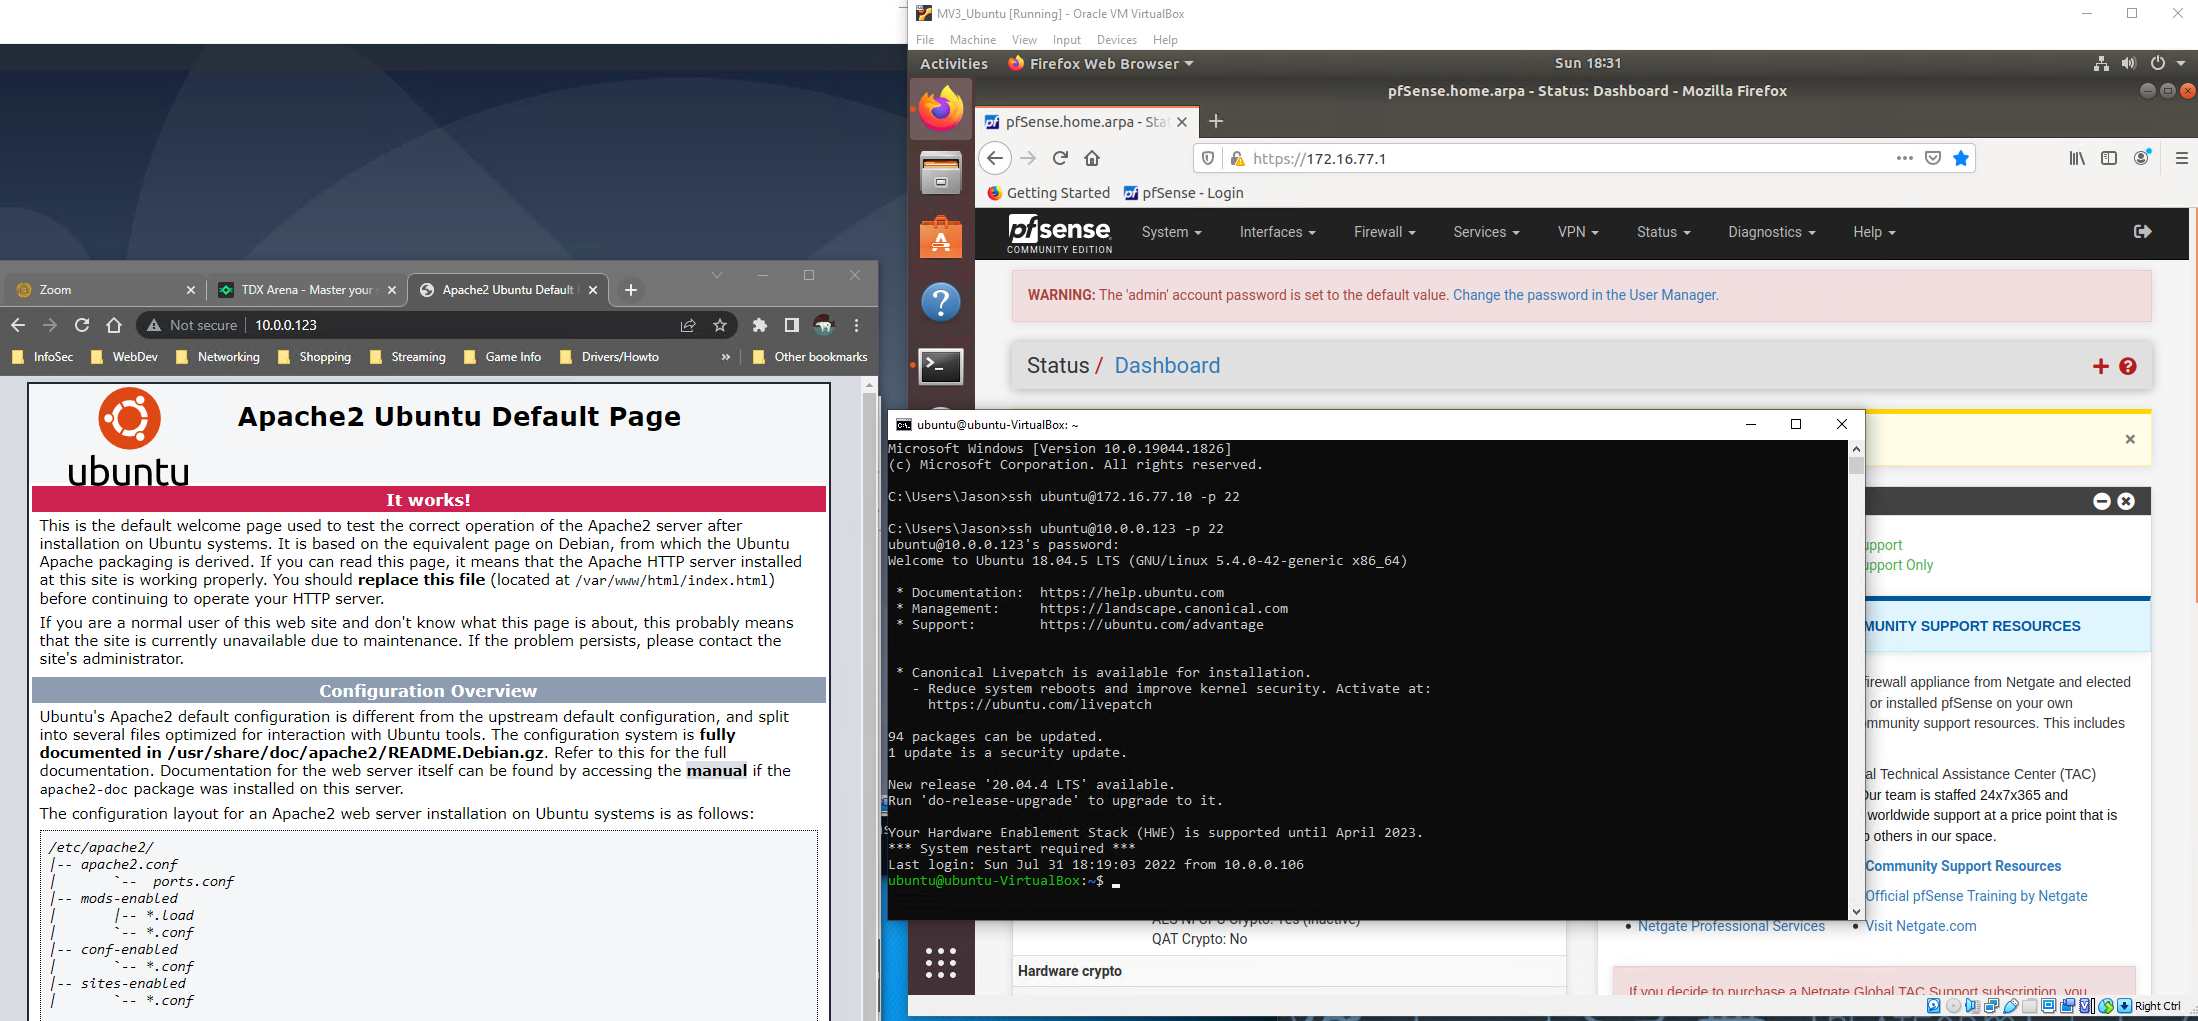
Looking at the services there is an apache2 server running along with SSH on the Ubuntu machine. The web server can be accessed from the other VMs on the Internal Network. At 172.16.77.10 in the web browser.
Tip: Think about a solution to forward traffic from the WAN to the LAN web server. Remember that you will need to ensure the web server and SSH service (on the Ubuntu VM) are functioning.
1 Test access to your web server from the host machine. What is the issue in accessing the web server from your host machine?
The apache2 service on Ubuntu VM wasn’t running, after starting it then was allowed access from the Debian VM.
2 Test access to the web server from the Debian VM to verify its functionality.

3 Test access to the SSH service from the Debian VM to verify its functionality. Use the Ubuntu user credentials provided in the appendix at the end of this document.

For this connection to happen needed to add a new firewall rule to allow traffic on the LAN for SSH port 22 for the Ubuntu VM 172.16.77.10
Using the following command was able to connect via SSH from the Debian VM:
ssh ubuntu@172.16.77.10 -p 22
enter the password: ubuntu123
Connection successful within the local network
The following is for remote access to Web Server and SSH outside the network
4 In pfsense, create a NAT port forwarding rule to translate your external requests (SSH and HTTP) to internal addresses. Note: Set the NAT rule to automatically create a firewall rule on the WAN port to authorize the traffic.
Setting the range to work dynamically with the Redirect target IP to single host and the Redirect Target Port to the lower port being SSH (22) it automatically ends the port range.
5 Test access to your web server from your physical host by accessing the website via the pfSense WAN interface.
Connection successful from Host machine to Ubuntu VM via WAN 10.0.0.123:80 as well as an SSH successful connection from Host to Ubuntu VM via WAN with:
ssh ubuntu@10.0.0.123 -p 22
VM password: ubuntu123
-----We in!------
Before beginning Project Task #3, consider the following:
What evidence can you provide to show that everything works as expected?
A local screenshot showing both connections active, along with the connection status in the log files of pfsense. The above rules have been disabled in pfsense to show they are working will need to enable them through UI. No need to make them again.
Project Task 3: The All-Seeing EyeThe company's CISO decided to implement a detection and prevention system against potential known network attacks. She put you in charge of the implementation. You were asked to set up a mechanism capable of detecting DoS and Brute-Force attacks and verifying that they function correctly.
Tip: Search for a service compatible with pfSense that can provide the requirements specified by the CISO.
Questions and tasks:
1 Which service can provide a solution to the CISO's requirements?
Suricata
2 Check pfSense's current version and update it (if it isn’t on the latest version).
PfSense's version must be up-to-date to work with Suricata's. Open the browser on the Ubuntu machine and browse to the pfSense management webpage. Then, check the pfSense version.
3 Install the Suricata package required to accomplish the detection and prevention tasks.
This can be found under the Package Manager\Available Packages and search for Suricata. Hit install > Confirm

4 Configure custom rules to detect abnormal traffic received by the WAN interface.
New app can be found under Services/Suricata
Install the Suricata package required to accomplish the detection and prevention tasks.
Configure custom rules to detect abnormal traffic received by the WAN interface.
Use the following rules:
alert tcp any any -> any 22 (msg:"SSH Brute-Force Detected"; flags: S+; threshold: type both, track by_src, count 5, seconds 30; sid:5551; rev: 1;)
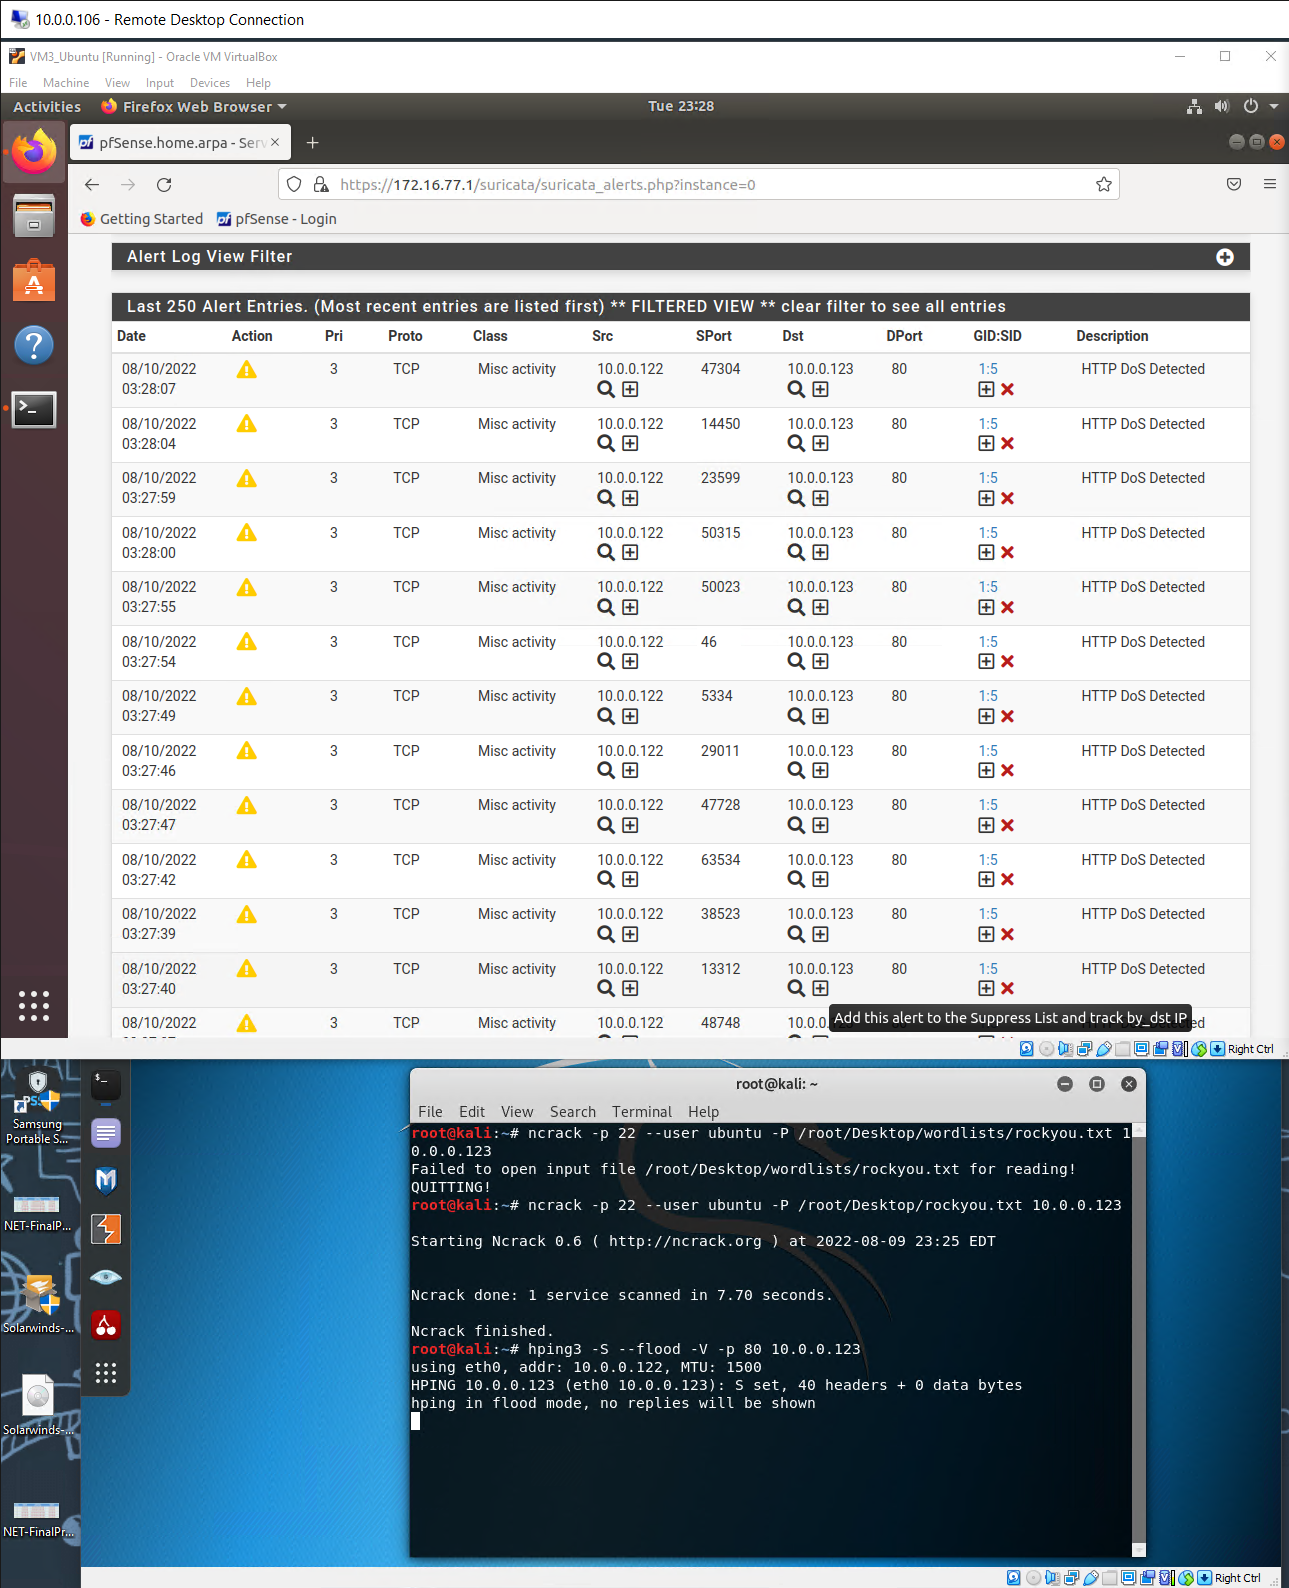
alert tcp any any -> any 80 (msg:"HTTP DoS Detected"; flags: S; threshold: type both, track by_dst, count 500, seconds 5; classtype:misc-activity; sid:5;)
Start the Kali Linux machine, execute the following command for 30 seconds and then press Ctrl+C to stop:
ncrack -p 22 --user ubuntu -P /usr/share/wordlists/rockyou.txt [pfsense WAN address] 10.0.0.123
Note: The command will run a Brute-Force attack (explained in detail in later courses). Press Ctrl+C to stop the attack. If it doesn’t populate the alert, run a few more times.
When the attack ends, run the following command for 30 seconds and then press Ctrl+C to stop:
hping3 -S --flood -V -p 80 [pfsense WAN address] 10.0.0.123
Note: The command will run a DoS attack. Press Ctrl+C to stop the attack.


 Network Security Final Project Write Up